HELLO Again EVERYONE!
I would ask that you come with me for another visit to #43 Green Dolphin Street. I am currently at work on the Little Kitchen and I MEAN LITTLE! Lucille had mentioned that she also has a tiny kitchen in her dollhouse ( in progress) and she was waiting to see how I would tackle mine. Well, Lucille, this ain't going to be easy but here is what I am working towards. Something that looks Old and is needing to be upgraded, and is just hanging on by a thread! hahhah What I really mean is that this kitchen will have seen Better Days but it suits the current occupant just fine!
So here is what it looks like so far.......
So here is what it looks like so far.......
 |
| Now don't think that this is what I decided to do and then DID IT! Oh no! That would have been how "Normal People" who have made drawings and have planned and take the proper steps forward, would work. No,.... this is what has evolved from a whole lot of unexpected problems that I tackled one after the other until it Became this. The first thing that you will notice is the paper tile floor that I was complaining about before. This is not so pretty but it is what it is and when the room is furnished I shall hide what is showing with a scatter rug and that will disguise a lot of it. Nothing I wish to discuss further. GIAC, CLOSE YOUR EYES! |
 |
| One evening I was sitting looking at the Parlor and I thought ,"I have Got to begin on the kitchen soon!" Trying to get going on anything is a real chore for me. I usually need a red hot poker to get me moving and so after thinking about doing it I bit the bullet and began. I had been putting it off for weeks and believe it or not what is motivating me now is Christmas! I want this house to be ready for Christmas and it won't be if I don't do anything but dream. So I began by papering the walls of the kitchen. Problem #1: I used the WRONG Wallpaper. I have two types and one roll looks like rough plaster and the other looks like bad acne. Even when I was applying it I thought "this doesn't look right", but I kept going anyway. Once it was up I HATED IT! |
 |
| Cottage Cheese Anyone!? |
 |
| I tried painting and aging it and now it looked like Painted and Aged Cottage Cheese. |
 |
| The solution was to Spackle over top of it. Which is what you see in this photo |
 |
| I have removed the dividing wall of the kitchen and the parlor and am laying it on really thick! I smoothed it out as I went so that I would not have to sand a whole lot and let dry between coats as I built up the layers. |
 |
| This is the wall after it has been plastered and painted and aged |
 |
| Once the paint was nearly dry, I lightly sanded it and off came some of the acrylic paint and it gave me this mottled plaster effect that I really liked! The beam that you see across the top of the wall is the Greenleaf cedar flooring that is coarse and wide grained and perfect for the faux ceiling beam. |
 |
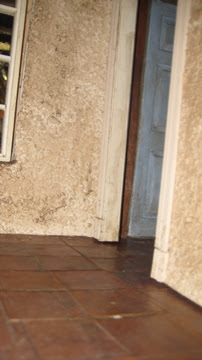
| Between waiting for the coats of plaster to dry down, I decided to cut a small window out of the stone wall so that I could have additional light and also so that I could get a view from the outside through the kitchen and into the Parlor. |
 |
| So this is what it looks like now totally empty |
 |
| Okay, I must admit that I was really getting into this kitchen transformation by now. It was looking quite rustic and very old and the plaster walls had some real visual depth that was a pleasure to look at. But I still had a 3rd wall to do and I was nearly out of plaster. I decided to do it anyway which brings me to Problem #2. I ran out of Spackle! |
 |
| I had to work out how to stretch the small amount that I had and the solution that I came up with was to mix the small amount of what was left of the Spackle with another product and that was what I did! I mixed the remainder with LIQUITEX TEXTURE GEL that I had bought a last year from Michael's craft store and the finish was very satisfactory. It looks like a dense and a hard stone! The plaster walls have a soft depth that this one wall doesn't have but this wall looks really hard! I painted and aged the wall as I did with the other 2 and then lightly sanded it and off came some of the finish. PERFECTO! |
 |
| this is the product that I used to mix with the Spackle. It is very grainy and yet very light and when I mixed it with the Spackle the color dried down to a mottled yellow all by itself. I believe it is because of the nature of the Spackle that starts out Pink and dries to a natural white. The chemical when mixed with the gel reacted as it did without my knowing that it would. ( This hobby is full of wonders!) |


This kitchen is turning out quite Okay after all! The walls are taking on some history and that ALWAYS makes me happy! I sealed everything with Matt Mod Podge so that it would keep the finish on the walls. That new little window is high up so that it can clear the staircase that needs to be installed. So this is what the 2 rooms look like side by side.


 |
| The view through the little side window into the Parlor. |
 |
| So at this point I need to start on the layout of the kitchen. Where will the appliances go and what size do they have to be to enable a decent work center. I need to see how the room will look with the staircase and how much room will it eat up. I used my daughters old ruler and a paint stir stick and one of the Arthur stringers that used to be glued to the centre of the house. |
 |
| This Mock Up gave me a good idea of what space I would have available for a stove a sink and a fridge...... NOT MUCH! |


 |
| I think that I can easily get a stove under the stairs as the Chrysonbon cast iron stove demonstrates. But I do Not want This stove. I think that I want an AGA but I may have to make my own. That will be a challenge and I want it with a fireplace surround. Will that be possible? The work table is here to calculate the length that I shall need for a sink and counter. The modern fridge is not an option. I shall have to build one for under the counter so that I can have some space for display. It is a nice fridge and the door swings open and everything but sorry, not the best for this project. The fridge is just too tall and blocks the light. It shortens the site line and makes the space look even more congested than it already is. (sigh...too bad, so sad) |
 |
| I will NOT be using this stove for a number of reasons. 1. It is American and not English 2. It protrudes out too far from the wall. I NEED All the space I can squeeze out of this kitchen and that space would be wasted. 3. The danger of a severe burn by a doll, accidentally backing into a hot iron stove given the tightness of the distance between the 2 walls, is not something I am willing to risk. I want this space to be pleasant to work in not a health hazzard! (You see how seriously I take this!? hahahah) |
 |
| I'm just getting a feel for the space. |

 |
| I decided to try a large ornate mirror over the temporary work table and it allowed the stove to be reflected in it! I love mirrors and I love this effect of this in the kitchen. In my Real Life kitchen, I have placed a mirror over the sink so that while at it, I can still connect to the dinner guests that are sitting right behind me as I work. It has made a much better view for them and me. I really want to keep this mini mirror in the kitchen. Which will bring me to Problem #3 STORAGE AND DISPLAY |
 |
| From this angle you can see that there is not a whole lot of room for all the kitchen bits and pieces that make up a regular kitchen work space. I shall need to build in some kind of storage and display above and /or around the stove unit that I decide on. I may need to bring a small wall down from the top of the underside of the staircase and make some shallow shelves recessed into the dead area under the stringer. While I was waiting to come up with a solution I still had to paint the ceiling and texture and age it. |
 |
| I need to age the ceiling |
 |
| I mentioned before that the ceiling in the Parlor had too much Newness for the look that I was aiming at. I needed something that didn't look like it was installed last week, instead of decades ago. I don't know if you can see how I've made the ceiling sort of rough and splotchy!? Well, .... it is. |


Side by side you can compare the Parlor ceiling and the new-looking kitchen ceiling. Can you see what I mean Now!? To make it look old, I used a mix of The LIQUITEX AND HAIR MOLDING PASTE. I painted it on with a brush and waited for it to dry.

 |
| Looks nice and grainy |
 |
| When it was dry, I mixed the hair molding paste with a little bit of yellow acrylic paint and again used a brush to paint it on the ceiling. It kind of grabs in some spots and not in others, and looks like it has been peeling away for years! When it was nearly set up, I added a touch of amber glass paint which I mixed with a little of the left over paste/paint mixture and Voila! A DIRTY OLD CEILING |


 |
| Now you may be wondering just how I thought of using this stuff. Well, I didn't really think of it at all. I was in the dollar store and this was in with the craft supplies and all I really saw when I bought it was Molding Paste and not the DIPPITY DO for hair! I was thinking art project and it wasn't until I had mixed it with the textured gel that I saw it was for HAIR!? Duh!!! It began to separate as it dried and got splotchy and wouldn't you know?........ |
 |
| I couldn't be happier! elizabeth |


.jpg)

